
1. Chatbot introduction and scope of chatbot
1.1 Chatbot introduction
In this blog, we develop a chatbot that is able to answer user input. The chatbot will be deployed on server instead of local machine in order for user to access via website to use it anytime.

Figure 1.1. Chatbot flow
The role of each stage:
- User: Gives requirements for chatbot.
- Web UI: Web-based user interface, allows user to interact with chatbot as well as other features on website.
- Chatbot Backend: Dialogues and logic processing center, user input will be processed here.
- AI Model: Provides the chatbot with ability to understand human language, which helps generate responds.
- Response: Chatbot responses are generated and displayed on the web.
1.2 Determine the scope of chatbot and its features
Because this blog focus on building a simple web-based chatbot, its features will be limited to fit the response efficiency.
Only accept text input:
The input is limited to string input to reduce the inference time. User topic can be widespread.
Customizable system prompt / personality:
Below are the available features integrated on the Web UI, user can config these parameters to customize the chatbot response:
- Multilingual support: User can input question in English or Vietnamese.
- Basic safety / content filtering: Filters out sensitive keywords, contents.
- Temperature / creativity slider: Adjusts chatbot’s creativity with slide bar.
- Response length control: Limits the responses length.
Clear chat / restart button: Erases chat hsitory.
2. Code Implementation
2.1 Choose tech stack
In this blog, we will select these tech stack for the chatbot:
Programming language: Python
- Python is selected due to its simple syntax as well as it supports a wide variety of libraries for chatbot.
Model framework: Hugging Face
- Hugging Face is an open-source platform for AI, including large datasets, AI models. By using Hugging Face, we can easily find and apply appropriate AI models.
Model deployment: Hugging Face Space
- Hugging Face Space support deploying simple model, which is suitable for small projects.
Web deployment: Streamlit
- Streamlit is used to make Web UI for chatbot thanks to its high adaptability with python, easy to develop and maintain, which fits well with small chatbot project and does not require much knowledge in frontend programming.
2.2 Core code structure – Chatbot code structure
We go directly into the project code, explaining each main component to clearly show how the chatbot is built, from the user interface to the AI model.
The overall project structure is as follows:
├── requirements.txt        # List of required libraries
└── src
    ├── app.py              # Chatbot UI + chat handling logic
    └── llm.py              # Load LLM and generate responses
Chatbot interface (app.py)
The chatbot interface is built using Streamlit, with the following goals:
- Simple
- Easy to use
- Easy to deploy
The interface consists of only two main parts:
[ User input box ]
[ Bot response area ]
In addition, there is a sidebar for chatbot configuration.
Caching the model to avoid reloading
The AI model is loaded only once when the user accesses the web page thanks to @st.cache_resource:
@st.cache_resource
def get_chatbot():
    return Chatbot(model_name="Qwen/Qwen2.5-1.5B-Instruct", use_gpu=False)
This helps the application run more smoothly and saves resources by avoiding loading the model multiple times.
Chat state management (Session State)
Streamlit does not automatically persist state between interactions, so chat history is stored using st.session_state. When the application starts, if no chat history exists, the system initializes a system prompt:
def initialize_session_state():
    if CHAT_HISTORY_KEY not in st.session_state:
        st.session_state[CHAT_HISTORY_KEY] = [
            {
                "role": "system",
                "content": "You are a helpful AI assistant. Your answers are concise and to the point."
            }
        ]
This system prompt defines the personality and behavior of the chatbot.
Displaying chat history
The conversation UI is re-rendered every time the user interacts:
def display_chat_history():
    for message in st.session_state[CHAT_HISTORY_KEY]:
        if message["role"] != "system":
            with st.chat_message(message["role"]):
                st.markdown(message["content"])
Each message has a role (user or assistant), allowing Streamlit to display the correct conversational role.
Handling user input and generating responses
When the user enters a question, the entire processing flow happens inside the handle_user_input() function.
Detailed logic flow:
- Receive input from the user
- Save input to chat history
- Limit the number of remembered chat turns
- Send chat history to the AI model
- Receive and display the response
if user_input := st.chat_input("Ask something..."):
After adding the user question to the chat history, the system trims older messages if the maximum allowed turns are exceeded:
if len(st.session_state[CHAT_HISTORY_KEY]) > (max_history * 2) + 1:
    st.session_state[CHAT_HISTORY_KEY] = [
        st.session_state[CHAT_HISTORY_KEY][0]
    ] + st.session_state[CHAT_HISTORY_KEY][-(max_history * 2 + 1):]
This helps to:
- Reduce prompt length
- Improve response speed
- Avoid memory overload
Since free-tier environments have very limited resources, we should only allow memory for 1–10 previous chat turns.
Chatbot configuration sidebar
Users can adjust basic chatbot settings directly from the UI:
- Temperature: creativity level
- Chat memory: number of remembered chat turns
- Max tokens: response length
- Clear chat: reset the conversation
temperature = st.slider("Temperature", 0.0, 1.0, 0.7, 0.1)
max_history = st.selectbox("Chat memory", range(1, 11), index=2)
max_tokens = st.selectbox("Max Tokens", [256, 512, 1024], index=1)
AI model & response generation logic (llm.py)
AI processing is separated into the llm.py file via the Chatbot class. This separation makes the code clearer, easier to maintain, and allows changing the AI model without affecting the UI or chat flow.
Loading the Qwen model
The model used in this project is:
Qwen/Qwen2.5-1.5B-Instruct
The model is loaded in CPU mode to allow easy local execution and deployment on free platforms with limited resources:
self.model = AutoModelForCausalLM.from_pretrained(
    self.model_name,
    device_map="cpu",
    torch_dtype=torch.float32,
    low_cpu_mem_usage=True
)
The corresponding tokenizer is also loaded:
self.tokenizer = AutoTokenizer.from_pretrained(
    self.model_name,
    return_token_type_ids=False
)
Generating responses from chat history
The generate_response() function takes the entire chat history and generates a response.
Step 1: Combine chat history into a prompt
text = self.tokenizer.apply_chat_template(
    chat_history,
    tokenize=False,
    add_generation_prompt=True
)
Step 2: Tokenization
model_inputs = self.tokenizer([text], return_tensors="pt").to(self.device)
Step 3: Generate output
generated_ids = self.model.generate(
    **model_inputs,
    max_new_tokens=max_tokens,
    temperature=temperature,
    do_sample=True,
    pad_token_id=self.tokenizer.eos_token_id
)
Step 4: Decode tokens into text
response = self.tokenizer.batch_decode(
    generated_ids,
    skip_special_tokens=True
)[0]
The final result is a natural-language response displayed directly in the chatbot UI.
2.3 Testing locally
After completing the code, the next step is to run the chatbot locally before deploying it.
Environment setup
Install the required libraries:
pip install -r requirements.txt
Run the application:
streamlit run streamlit_app.py
Open the browser at:
http://localhost:8501
Testing core functionalities
Once the chatbot is running stably, the next step is to verify the core functionalities to ensure the system works as expected—not just “responding,” but responding correctly and consistently.
Key points to test:
-
Multiple consecutive chat turns:
-
Conduct long conversations to test context memory. The chatbot should understand previous messages instead of treating each question as a new session.
-
Adjusting temperature
-
Change the temperature value to observe creativity levels:
-
Low value → stable, less varied responses
-
High value → more flexible and creative responses (but more prone to drifting)
-
Changing max_tokens
-
Used to control response length, preventing responses from being too short or excessively long.
-
Clear chat
- Test the conversation reset feature
- Chat history is fully cleared
- System prompt is re-initialized correctly
- This ensures the chatbot does not carry “old memories” into a new session.
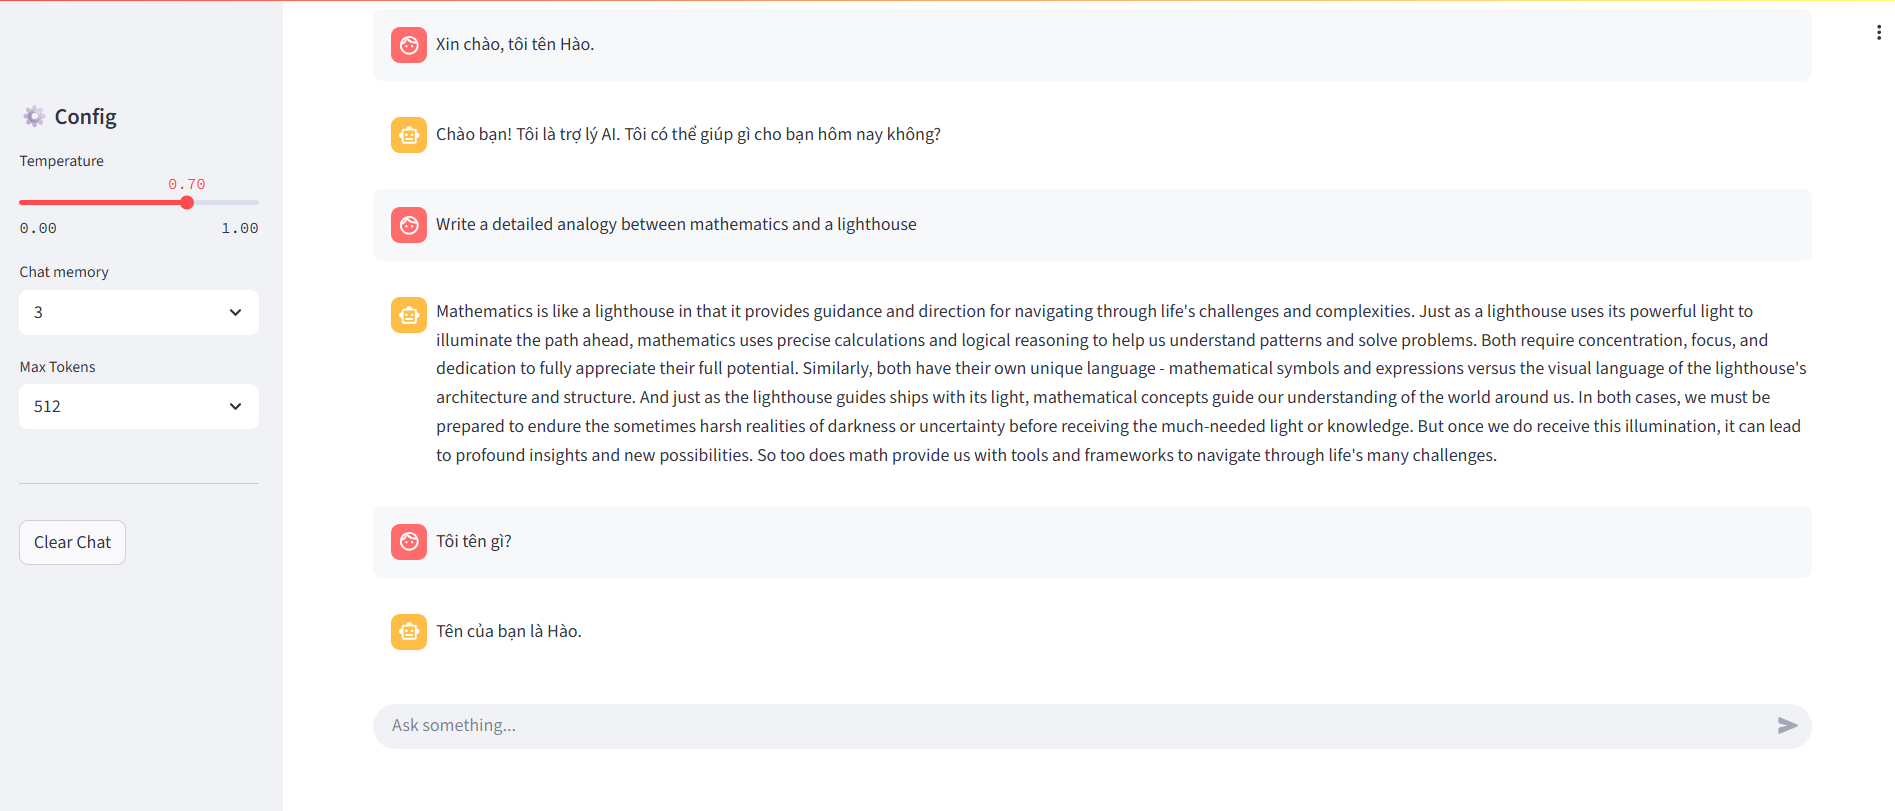
Figure 2.1. Interface of a simple AI chatbot
Test response speed on CPU and evaluate whether the chatbot meets real-world usage needs, especially in environments without GPU support.
This testing step helps identify issues related to logic, performance, and user experience early, before the chatbot is used for demos or real deployment.
Full source code at Github**
Notes when testing locally
- The first model load will be relatively slow
- CPU execution is not suitable for large-parameter models
- Avoid testing with multiple users simultaneously
However, for demo and learning purposes, this configuration is completely suitable before deploying the chatbot to the cloud.
3. Proposing and cloud deployment
3.1. Suggested Deployment Platforms
When deploying an AI chatbot, choosing the right platform directly affects how easy it is to deploy, the cost, and the demo experience. Today, there are many options available, each suited for different goals. The table below compares some popular platforms for deploying chatbots, from learning demos to real-world applications.
| Platform | Hugging Face Spaces | Streamlit Cloud | Render | Cloudflare Workers | Vercel |
|---|---|---|---|---|---|
| Chatbot UI support | Built-in (Gradio, Streamlit) | Built-in (Streamlit) | Not included | Not included | Not included |
| AI model deployment | Very suitable for ML/LLMs | Suitable for light demos | Manual setup required | Not suitable for heavy models | Not suitable for heavy models |
| Initial setup | Create a Space, upload code | Connect GitHub | Configure services | Write worker scripts | Configure project |
| Cost | Free for demos | Free with limits | Free tier available | Free per request | Free tier available |
| Best use case | Demos, learning, AI showcase | Quick demos | Small backend services | Lightweight API backend | Web apps + API |
Table 3.1. Comparison of deployment platforms
Quick Notes on Each Platform
-
Hugging Face Spaces
This is the best choice for AI chatbot demos. It supports machine learning models directly and provides ready-to-use chat UI. Ideal for students, technical blogs, and project showcases. -
Streamlit Cloud
Works well if your chatbot is built with Streamlit. It’s easy to use, but running heavy models and deep system customization are more limited compared to Hugging Face Spaces. -
Render
Good for deploying chatbot backends as APIs. However, you need to build the UI yourself and handle more configuration, so it’s not ideal for quick demos. -
Cloudflare Workers
Very strong for APIs and lightweight production systems, but not suitable for running large AI models directly. Commonly used when the chatbot calls external AI APIs. -
Vercel
Great for frontend and serverless APIs. That said, AI chatbots usually need to be combined with external AI services, so it’s not optimal for running LLMs directly in a demo.
Why This Blog Chooses Hugging Face Spaces
With the goal of deploying a chatbot for free, keeping setup simple, and providing a visual demo, Hugging Face Spaces fits best:
- No complex DevOps setup
- Built-in chat UI with Gradio
- Can run AI models directly
- Easy to share demo links in blogs and GitHub README
Because of that, Hugging Face Spaces is chosen as the deployment platform for the chatbot in this article.
3.2 Deploying the Chatbot to Hugging Face Spaces
After successfully testing locally, the next step is to bring our AI chatbot to the cloud so everyone can experience it.
3.2.1 Clone the Source Code and Prepare
To get started, clone the sample repository that the team has prepared. This repository has been optimized to run on Hugging Face's Docker environment.
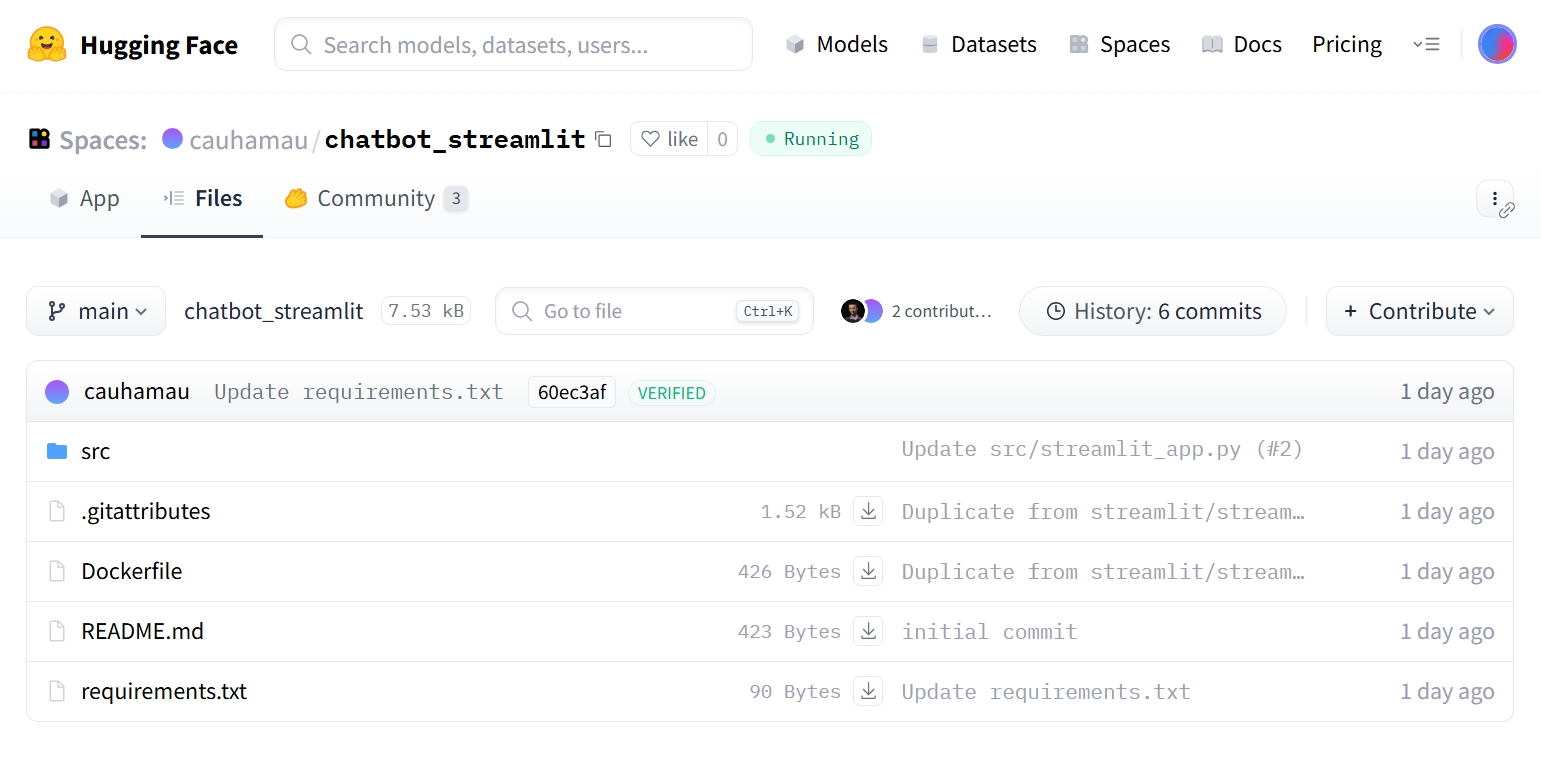
Figure 3.2.1 Sample AI chatbot repository
Use the terminal and run the following commands:
git clone https://huggingface.co/spaces/cauhamau/chatbot_streamlit
cd chatbot_streamlit
Main folder structure:
src/streamlit_app.py: Streamlit application interface.src/llm.py: LLM model handling logic (loading model, text generation).Dockerfile: Server environment configuration file.requirements.txt: List of required Python libraries (torch, transformers, bitsandbytes...).
3.2.2 Customization
Before pushing to the cloud, you can adjust a few parameters to make the chatbot more personalized:
- Change the Model: By default, the code uses Qwen/Qwen2.5-1.5B-Instruct. If you want faster responses (with a slight trade-off in accuracy), you can switch to a lighter version like 0.5B in the src/llm.py file:
python return Chatbot(model_name="Qwen/Qwen2.5-0.5B-Instruct", use_gpu=False) - Customize the Interface: Open the src/streamlit_app.py file to change the title (st.title) or add your own introduction in the sidebar.
3.2.3 Steps to Deploy on Hugging Face
Step 1: Create a New Space on Hugging Face
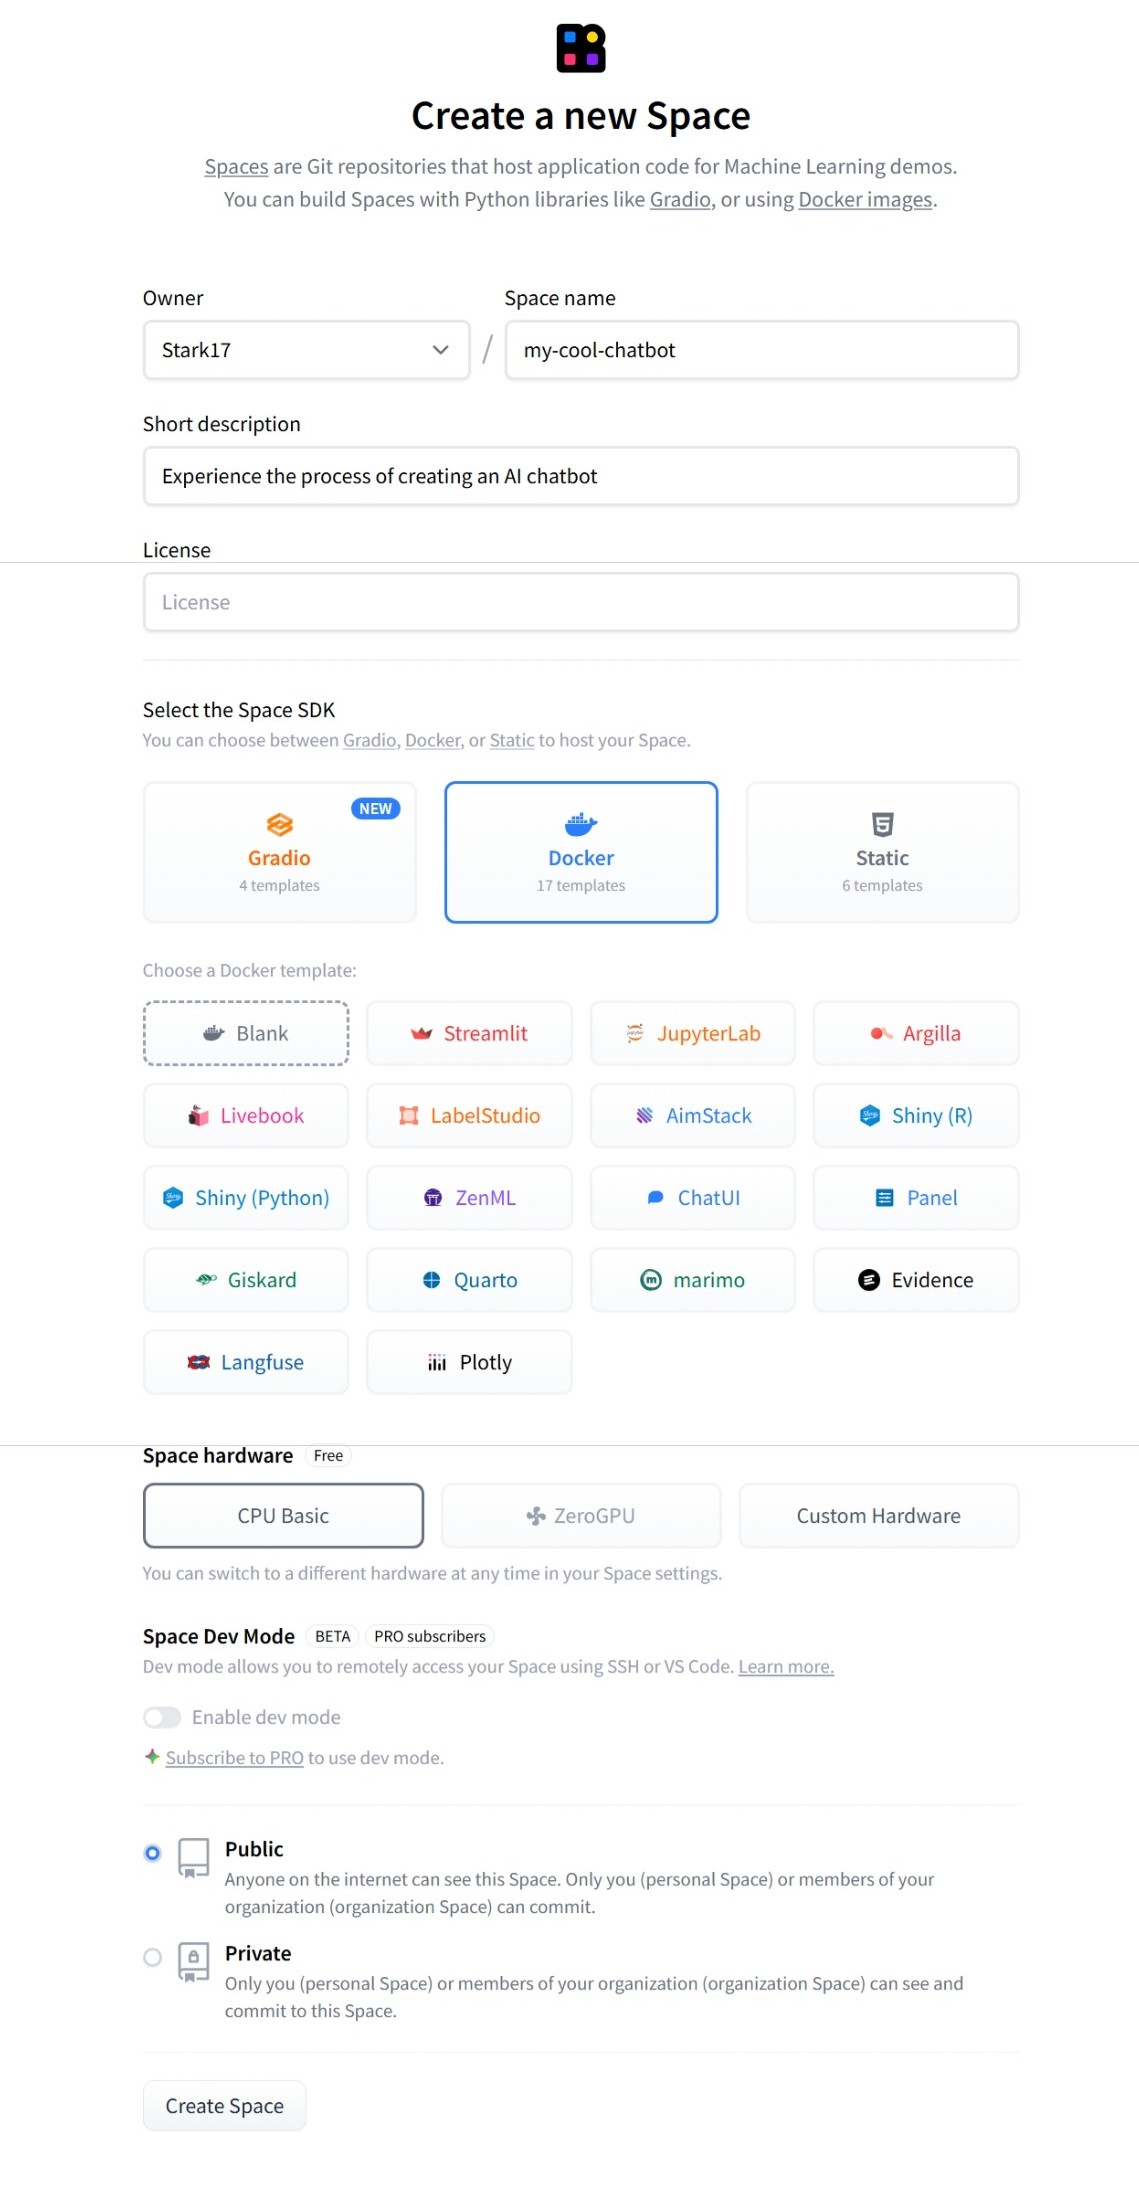
Figure 3.2.2 Creating a New Space on Hugging Face
- Visit huggingface.co and log in.
- Click the New button (top right corner) → select Space.
- Give your Space a name (e.g.,
my-cool-chatbot). -
Select the Space SDK: Choose Docker. Then, in the Docker template section, select Streamlit (since our codebase is built with this framework). Using Docker ensures heavy libraries like PyTorch run stably.
-
Hardware: Choose CPU basic (free) or upgrade to GPU if you have budget.
-
Click Create Space.
Step 2: Upload the Source Code
Hugging Face will guide you on how to push your code. There are two main methods:
- Method A: Using Git (Recommended): Connect your current folder to the newly created Space and push the code.Bashgit remote set-url origin https://huggingface.co/spaces/YOUR_USERNAME/YOUR_SPACE_NAME
git push origin main - Method B: Manual Upload: Go to the Files tab on your Space, click Add file → Upload files and drag-and-drop the entire
srcfolder,Dockerfile, andrequirements.txt.
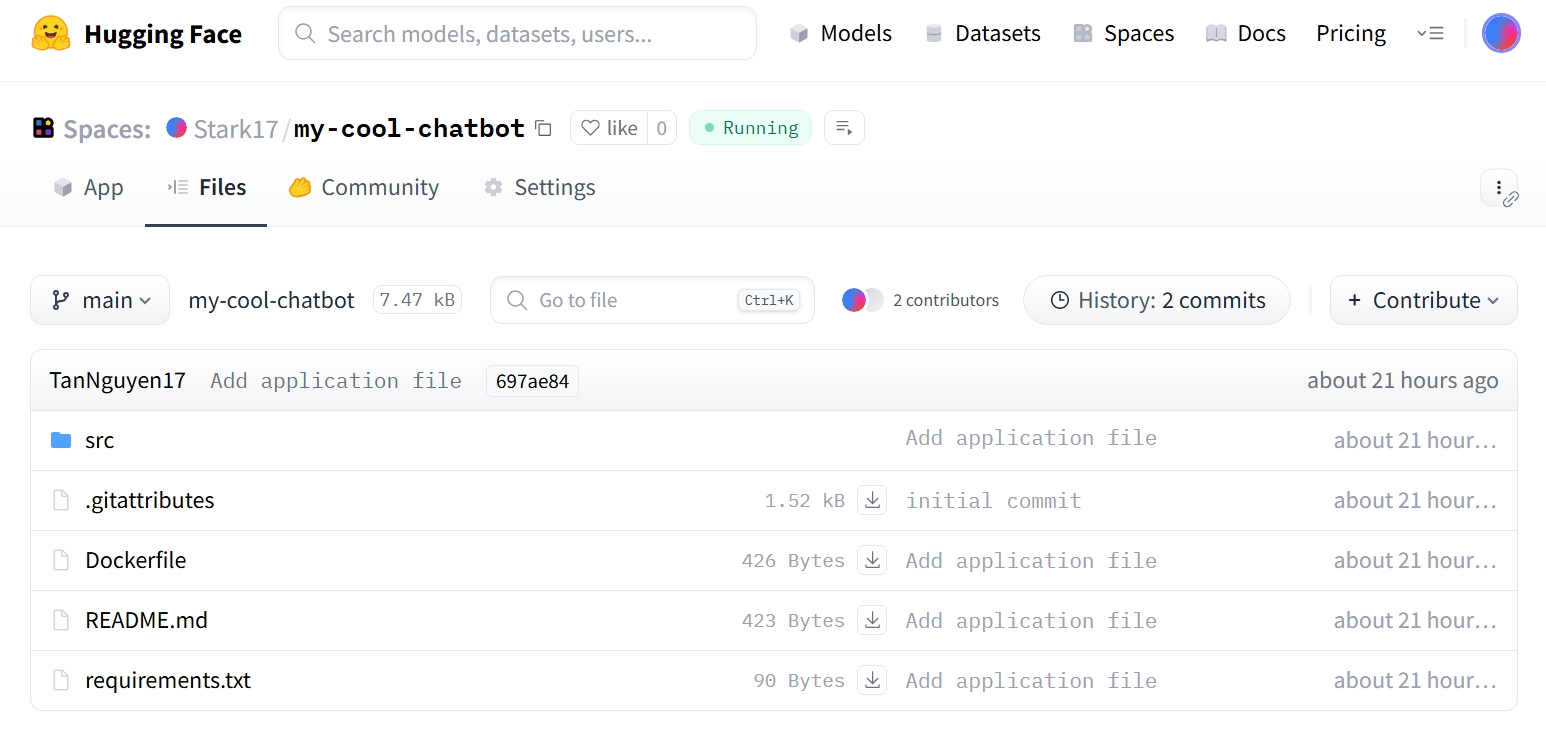
Figure 3.2.3 Code repository after uploading to Hugging Face Space
Step 3: Wait and Experience
After pushing the code, Hugging Face will automatically detect the Dockerfile and start the Building process.
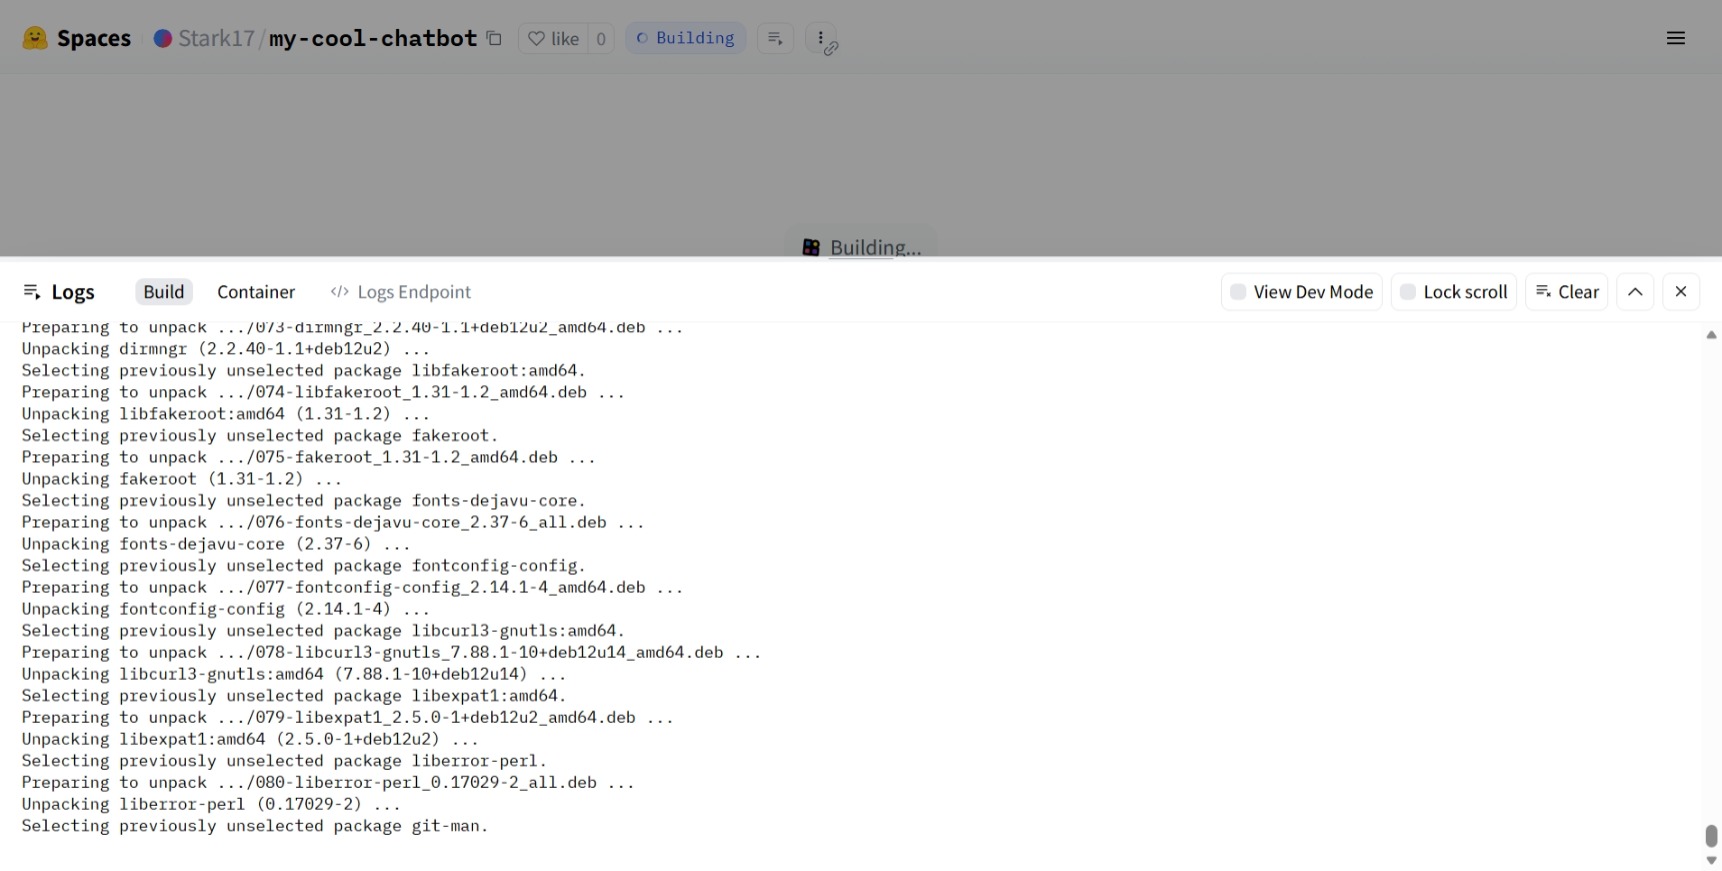
Figure 3.2.4 AI chatbot in the deployment process on Hugging Face
- You can monitor progress in the Logs tab. Installing libraries and loading the model may take about 3–5 minutes the first time.
- When the status turns green Running, your chatbot is ready!

Figure 3.2.5 AI chatbot ready for use
Quick tip: If the app encounters an "Out of Memory" error, consider using a smaller model (such as Qwen 0.5B) or enabling 4-bit quantization (already configured in llm.py).
4. Limitations of Free Deployment
Deploying chatbots on free platforms like Hugging Face Spaces offers many benefits for learning and demos. Still, to use them effectively, it’s important to understand their real-world limitations.
4.1. Performance and Response Time
One of the most noticeable issues with free deployments is inconsistent response speed. The chatbot may respond slower than when running locally or on stronger infrastructure, especially when:
- The model reloads after inactivity (cold start)
- Many users access it at the same time
- The question requires long responses
This happens because free tiers only provide limited CPU and memory. For demo and learning purposes, though, the delay is usually acceptable.
4.2. Computing Resource Limits
Free platforms typically limit:
- RAM
- Continuous runtime
- GPU usage
Because of this, free deployments are not suitable for very large models or long-running, complex tasks. In practice, demos should focus on:
- Lightweight or optimized models
- Limiting the number of generated tokens
- Avoiding heavy parallel processing
This is also why defining the chatbot’s scope early on is so important.
4.3. Scalability Limits
Free deployments are not designed for production use. As the number of users increases, the chatbot may face issues such as:
- Slower responses
- Timeout errors
- Temporary unavailability
For that reason, free deployments are best used for demos and experiments, not systems that require high stability or large-scale usage.
4.4. Security and System Control Limits
In free environments, control over security, logging, and monitoring is limited. Developers usually cannot:
- Deeply customize network settings
- Set up complex security mechanisms
- Track detailed user behavior
As a result, demo chatbots should avoid handling sensitive data and only be used in low-risk scenarios.
4.5. Why These Limits Are Still Acceptable
Despite these constraints, free chatbot deployment is still a very reasonable choice when the goal is to:
- Demo for instructors or viewers
- Learn and experiment with AI chatbots
- Present ideas and system architecture
More importantly, working within constraints helps developers better understand real-world trade-offs, which leads to stronger thinking when scaling chatbots in the future.
In short, free deployment is not meant to replace production infrastructure. It serves as a bridge—helping a chatbot move from a local prototype to a usable, shareable web application.
5. Conclusion
Deployment is the step that turns a chatbot from a local program into a product that can be used directly in a browser. By deploying a chatbot with Gradio and Hugging Face Spaces, we can create a complete demo without complex infrastructure or high costs.
More importantly, the deployment process helps developers understand the full lifecycle of a real AI application—from defining scope and writing code to running it in the cloud. Once this mindset is clear, future improvements—such as better UI, performance optimization, or custom data integration—become much easier.
No complex systems or large budgets are required. With the right direction and the right tools, anyone can deploy an AI chatbot online.
References
KDNuggets. (2025). 7 Best FREE Platforms to Host Machine Learning Models. Retrieved from https://www.kdnuggets.com/7-best-free-platforms-to-host-machine-learning-models
Thakur, P. (2024, December 30). Deploy Gradio Apps on Hugging Face Spaces. PyImageSearch. Retrieved from https://pyimagesearch.com/2024/12/30/deploy-gradio-apps-on-hugging-face-spaces/
ShafiqulAI Blogs. (2025). Deploy Gradio App to Hugging Face Spaces – Full Step by Step Guide. Retrieved from https://shafiqulai.github.io/blogs/blog_5.html
DeepWiki. (2025). Deployment and Hosting (Gradio Guides). In justinms/gradio-guides. Retrieved from https://deepwiki.com/justinms/gradio-guides/6-deployment-and-hosting
Chưa có bình luận nào. Hãy là người đầu tiên!