
1. Overview
Hello everyone! When stepping into the field of Medical AI, specifically the medical image segmentation problem, we have certainly heard of U-Net. Since its inception, U-Net has changed the game thanks to its ability to segment images in extreme detail with a small amount of data.
But the truth is: There is no single U-Net model that can handle all types of medical images.
Computed Tomography (CT) scans are completely different from Magnetic Resonance Imaging (MRI). Identifying brain tumors is different from identifying blood vessels. If we only use the traditional U-Net, we would have to manually adjust dozens of parameters (input image size, loss function, learning rate, etc.) for each different disease. This process consumes weeks of manual fine-tuning, and the results are sometimes still mediocre.
And that is when nnU-Net ("No New U-Net" - meaning there is no need to create any new U-Net) appears to solve this problem.
2. What is nnU-Net? Why is it so good?
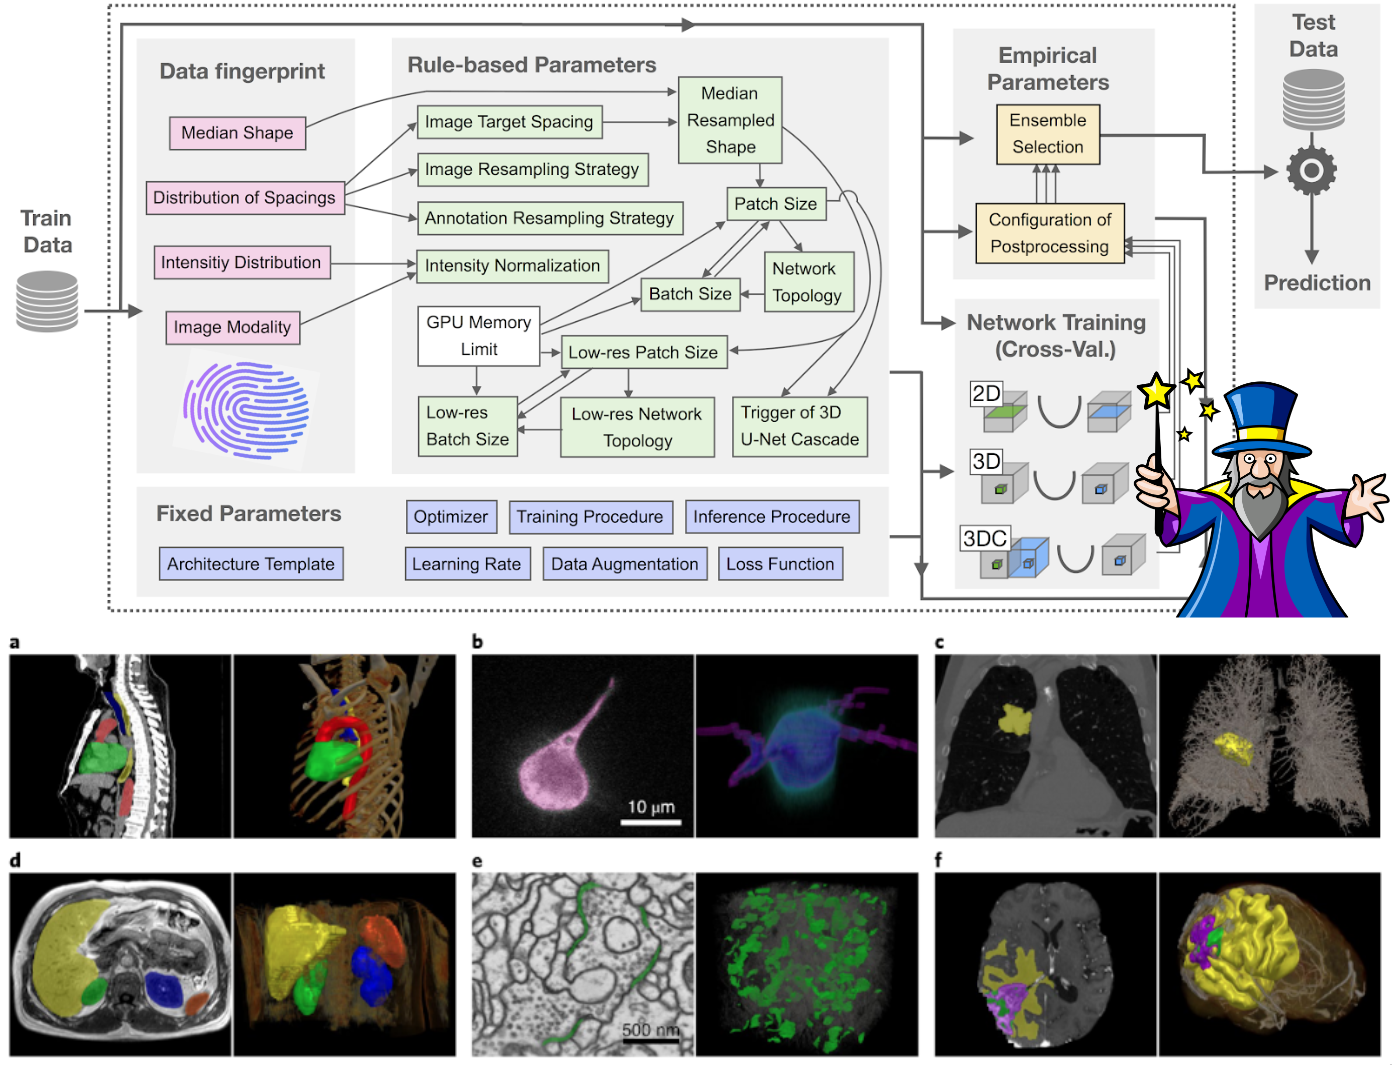
Figure 1: Overview nnU-Net
Instead of trying to invent a new, more complex neural network architecture, the creators of nnU-Net realized a fundamental truth: The original U-Net itself is already good enough; what we need to optimize is ALL the surrounding steps.
To put it simply, let's consider U-Net as a Formula 1 race car. Instead of trying to build a new engine, nnU-Net acts as an ultimate pit stop crew: automatically analyzing the track, automatically changing to the suitable tires, and automatically adjusting the suspension system.
Reality has proven that nnU-Net has significantly superior accuracy and recall compared to conventional U-Net versions in many complex problems and has dominated countless international biomedical competitions. It is designed as an "out-of-the-box" tool, meaning you do not need to be an AI expert to use it.
To achieve this, nnU-Net divides the configuration decisions into 3 groups, much like a cooking recipe:
-
Base spices (Fixed parameters): Things that can always be used for every problem, such as the basic convolutional structure, Adam optimizer, and a loss function combining Dice + Cross-Entropy.
-
Cooking according to ingredients (Rule-based parameters): nnU-Net will "read the fingerprint" of our data (whether the image is large or small, sharp or blurry) to automatically decide the patch size to fit the computer's memory.
-
Empirical seasoning (Empirical parameters): The model automatically tests various post-processing methods on the validation set to see which one yields the highest score and retains it.
3. Decoding the "Magic" behind nnU-Net: How does it process data and fine-tune parameters?
Have you ever wondered how a piece of code knows how to configure exactly without human intervention? The secret lies in an exquisitely programmed pipeline. Let's see how it "performs magic" directly on the BraTS brain tumor data:
3.1. "Taking the pulse" of the data (Data Fingerprinting)
Just like a general practitioner examining before prescribing, nnU-Net will scan through all your images to create a numerical "medical record" in the form of a JSON file.
3.1.1. Measuring dimensions and physical space
The system will scan through the entire 3D volume of thousands of patients for measurement. It automatically records the actual physical spacing between pixels (voxel spacing) in the BraTS data as 1x1x1 mm. At the same time, it calculates the median size of the brain volume after cropping out the empty margin areas to be 140x171x136 voxels.
Why is this important? From this spatial "blueprint", nnU-Net's system of heuristic rules has the data to calculate how large the patch size should be (usually 128x160x112) when cutting this giant image so as not to overflow your Graphics Card (GPU) memory during training. This size also directly determines how many layers deep the U-Net needs to be built.
3.1.2. Analyzing light intensity and removing noise (Intensity Statistics)
MRI images (like T1, T2, FLAIR) do not have an absolute standard light scale like normal images. Therefore, the fingerprint extractor must calculate a series of statistical indicators for each image channel such as: mean, median, standard deviation (std).
The million-dollar detail of nnU-Net: The algorithm is programmed to never take the absolute brightest (max) or darkest (min) values of the image. Because in medicine, sudden bright spots are usually just artifacts generated by the scanner's magnetic field. Instead, it takes the light percentile range from 0.5 to 99.5 (percentile_00_5, percentile_99_5). This method completely eliminates anomalies at both ends of the color spectrum, helping to retain the most authentic contrast range of the physiological tissues in the brain.
3.1.3. "Black space" handling strategy (Nonzero Masking)
BraTS data has been pre-processed by "skull-stripping", meaning the brain image sits inside a giant black background space. During the fingerprinting process, nnU-Net's module does a math operation and automatically realizes: This worthless black background occupies too much area, reducing the actual size of the image by more than 25% (i.e., more than 1/4).
Why is it important? As soon as this is detected, nnU-Net immediately records a special rule in the profile: When the model performs the brightness normalization step (Z-score normalization), it will completely ignore the black areas and only calculate based on the pixels containing the brain image (nonzero mask). If nnU-Net did not have this "pulse-taking" step, that giant black area would drag the average brightness value of the entire image down to a completely skewed level, causing the AI to lose direction and be unable to distinguish the boundaries of malignant tumors.
In short, the Data Fingerprinting step does not contain any AI network; it is purely measurements. But these exact figures act as a foundational blueprint for nnU-Net to automatically build a complete neural network, optimized specifically for the morphology of brain tumors.
3.2. Automatically selecting the normalization "filter"
Based on the "profile" established in 3.1, the computer proceeds to normalize the pixel numbers. With CT images (fixed X-ray intensity), nnU-Net uses global normalization. But with MRI images like BraTS, the lighting depends on each scanner generation, so nnU-Net automatically switches to an independent Z-score normalization algorithm for each channel on each patient. Specifically, thanks to the "Nonzero Masking" rule discovered in the Fingerprinting step, the black areas in the background are completely ignored when calculating the average value, helping the true contrast of the tumor not be blurred!
3.3. Weighing and measuring to "mold" the Neural Network
How does it know how many layers deep to build the U-Net (Network topology)? It is all math, not guesswork:
-
First, it looks at the RAM and GPU memory limits of your machine: It will prioritize creating the largest possible patch size to feed into the network, ensuring that when passing at least 2 of these patches at the same time (batch size = 2) into the GPU, your machine will not run out of memory.
-
Deciding the number of layers (Depth): Once the patch size is determined, a "fixed" formula will automatically halve the continuous space (downsampling) through pooling stages. This halving process will stop when the size of the image block shrinks close to the minimum core level (usually around $4 \times 4 \times 4$). The number of halvings is the depth of the U-Net! For BraTS, the algorithm usually automatically builds a perfect 5-layer deep network to recognize everything from microscopic details to the overall shape of the brain.
-
The 3D Cascade ultimate move: If the target organ is too gigantic (like the entire lung) but the hardware only allows cutting tiny patch sizes, the model will go "blind", like a blind man touching an elephant. At this time, nnU-Net automatically summons the 3D Cascade U-Net model (sequential network). Stage 1 will learn on a downsampled/blurred image to grasp the "overall map". Stage 2 uses that map as a "locator" to paint detailed boundaries on the extremely sharp original resolution image.All these headache-inducing calculations are automatically summarized and saved by nnU-Net into a file named plans.json so you can review them if you are curious!

Figure 2: Model 2D U-Net and 3D U-Net
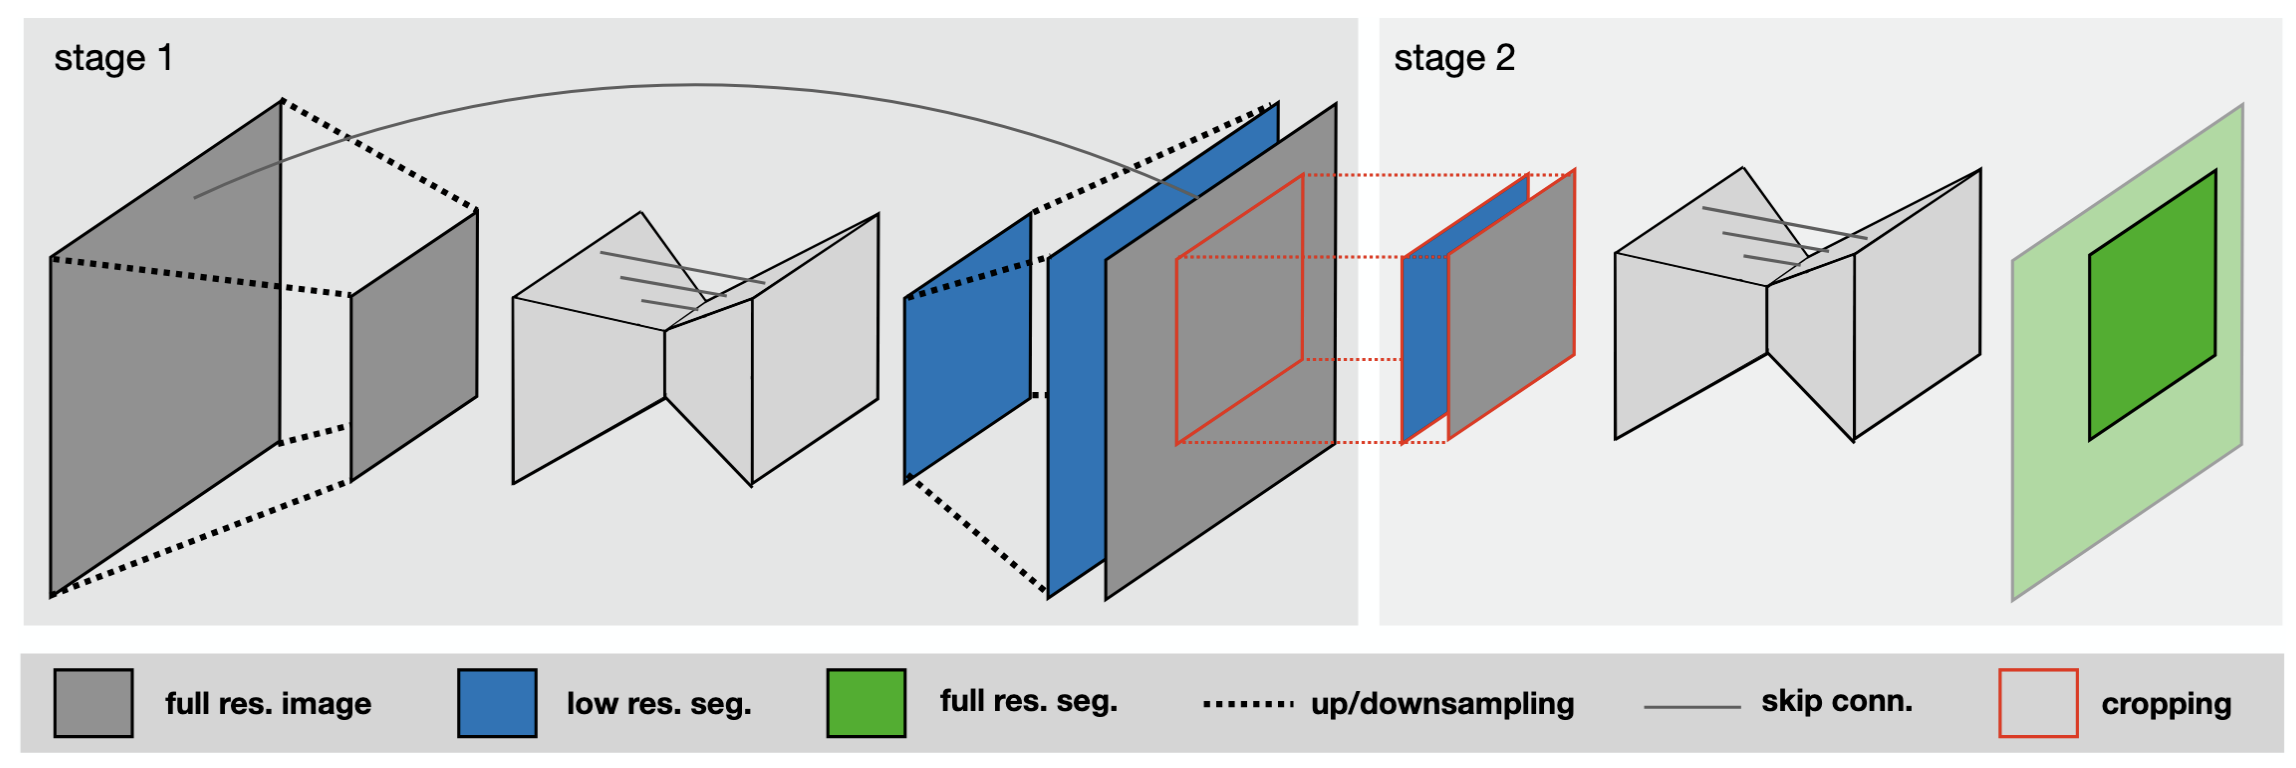
Figure 3: Model 3D Cascade
All these headache-inducing calculations are automatically summarized and saved by nnU-Net into a file named plans.json so you can review them if you are curious!
4. What are Fixed Parameters?
These are the "standard formulas" that the developers of nnU-Net concluded after testing on dozens of different medical datasets. Regardless of whether you are segmenting the brain, liver, or heart, nnU-Net found that these settings always yield the highest stability and efficiency without needing to be changed:
-
Architecture template: The model retains the U-shape (U-Net) with skip-connections. However, there are two fixed improvements:
-
Using the Leaky ReLU activation function instead of the traditional ReLU.
-
Using Instance Normalization instead of Batch Normalization. The reason is that 3D medical images are very heavy, and hardware configurations usually only allow loading 2 images at a time (batch size = 2). Batch Normalization performs very poorly with such a small amount, so Instance Normalization is the perfect fixed choice to normalize each image independently.
-
-
Optimizer & Learning Rate: The analysis table indicates that nnU-Net uses the SGD (Stochastic Gradient Descent) algorithm combined with Nesterov momentum ($\mu=0.99$) instead of Adam. The learning rate starts at 0.01 and gradually decreases following a polynomial curve (Poly learning rate schedule), helping the model learn quickly at first and fine-tune delicately in the final steps.
-
Loss Function: Fixedly uses a combination of Dice and Cross-entropy. Cross-entropy helps the model learn general textures quickly, while Dice helps the model focus on drawing accurate borders for small tumors, despite the black background occupying an overwhelming area.
-
Data Augmentation: Applies a massive set of transformations right during training to "challenge" the model, including: rotation, scaling, adding Gaussian noise, Gaussian blur, brightness adjustment, contrast change, low resolution simulation, and mirroring. This helps the model avoid rote learning.
5. Training Procedure:
The training process of nnU-Net is set up with very strict limits to ensure convergence:
-
Iteration limit: Fixed at 1000 epochs, each epoch consists of 250 minibatches.
-
Foreground Oversampling: This is an extremely smart technique of nnU-Net to deal with extremely small tumors. Normally, if taking random images, the model might only cut healthy brain areas or empty backgrounds. nnU-Net imposes a rule: Assure that 33% of the images cut out in each batch (equivalent to at least 1 sample per batch) must contain the foreground region (i.e., containing the tumor). This technique forces the model to constantly see and learn how to recognize pathology rather than just safely guessing "no disease".
6. Ensemble Selection Process
This is the "picking the best of the best" step that takes place after the training process is complete:
-
First, nnU-Net never trains just one single model. It divides the data into 5 parts and performs cross-training (5-fold cross-validation). It will do this for different configurations (e.g., 2D network, 3D Full-res network, and 3D Cascade network).
-
Instead of deciding arbitrarily, nnU-Net will perform a trial-and-error method (Empirical parameter). It takes the prediction results of these models applied to the validation set to score them.
-
Ensemble Strategy: The system will check the score of each individual model, then try pairing the models together (e.g., Taking the result of the 3D Full-res model plus the result of the 3D Cascade). This "pairing" is done by calculating the average softmax probabilities of the pixels.
-
Finally, nnU-Net will automatically select which option (a single model or a combined pair) yields the highest average Dice score to act as the official predictive model for future data. This "collaborative" process helps to smooth prediction borders and eliminate random errors of a single model.
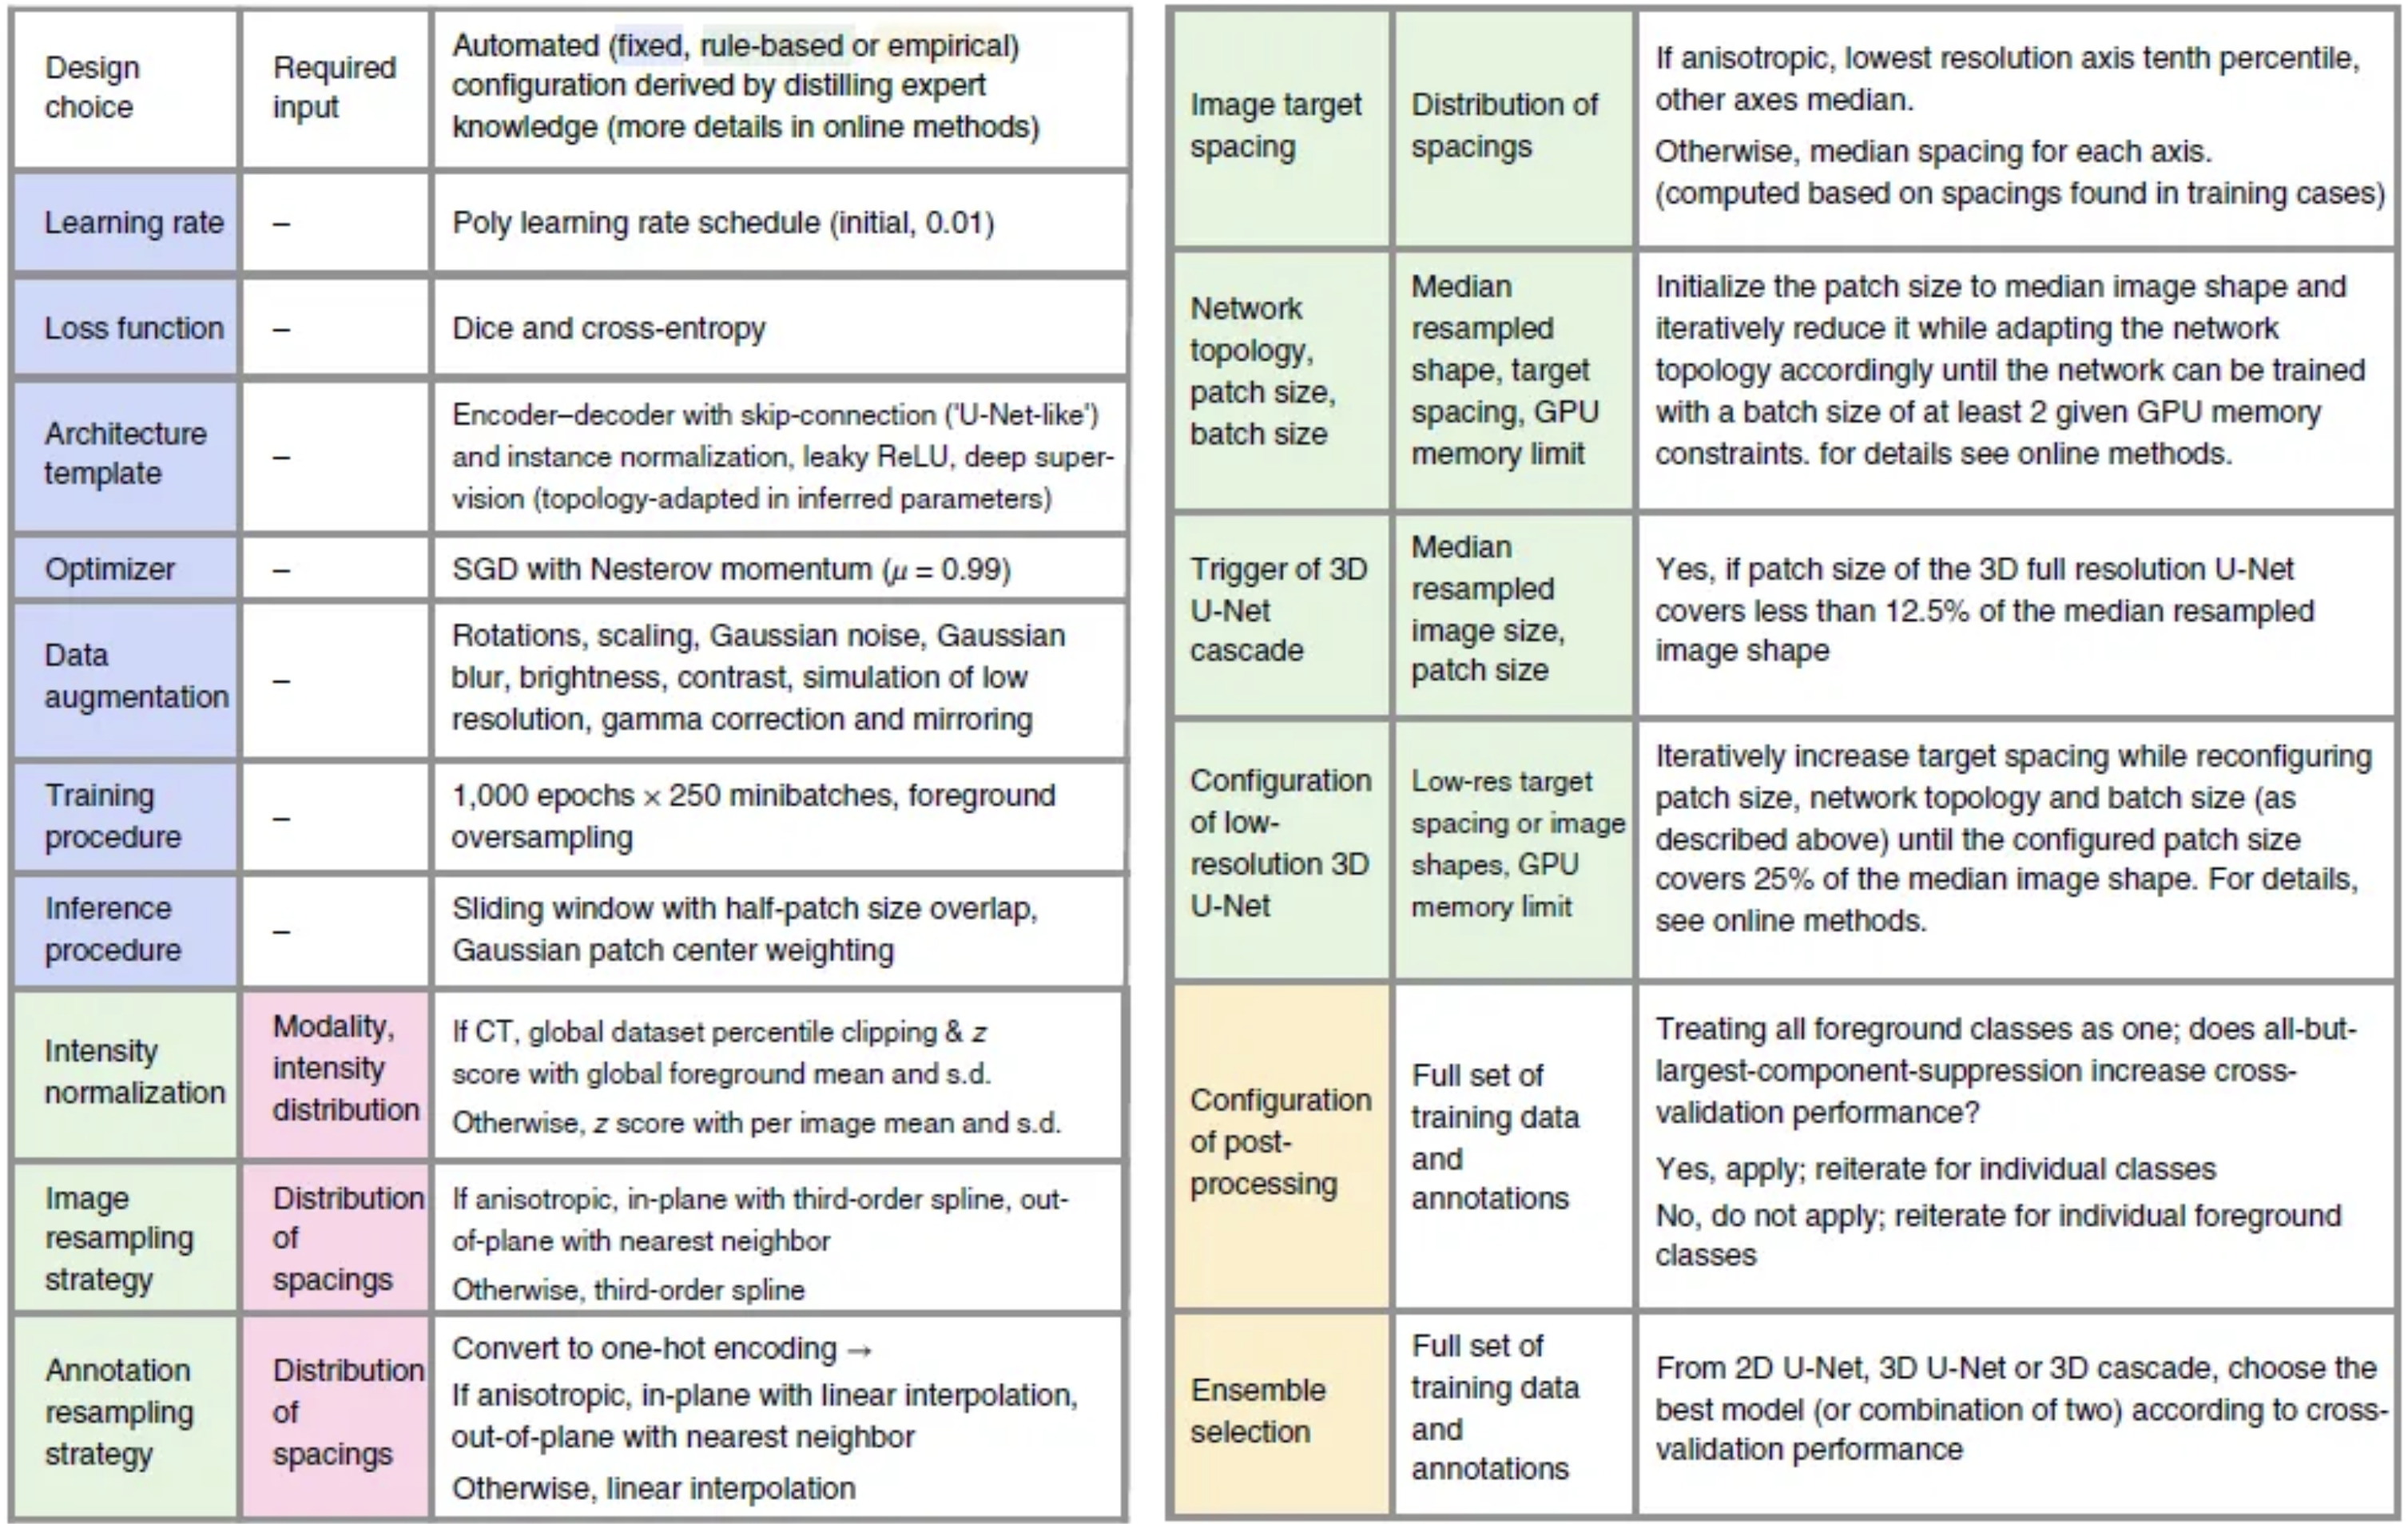
Figure 4: Proposed automated method configuration for deep learning-based biomedical image segmentation.
7. Applying nnU-Net to the BraTS Challenge
To see how powerful nnU-Net is, let's take it into "real combat" with BraTS (Brain Tumor Segmentation). This is a prestigious annual competition and dataset for brain tumors organized since 2012.
In the BraTS dataset, each patient will not only take 1 picture, but up to 4 different types of MRI scans. Just like using a regular camera, an infrared camera, and a night vision camera to view the same scene:
-
T1: Used to see the Necrotic Core region (the part of dead cells, looking dark).
-
T1ce (Contrast-enhanced): Helps to clearly see the highly active Enhancing Tumor region (lighting up).
-
T2 and FLAIR: Extremely sensitive to liquids, helping doctors see the entire Edema region caused by the tumor surrounding the brain.
Medical experts have manually colored (labeled) these 3 regions with numbers (Label 1, Label 2, Label 4).
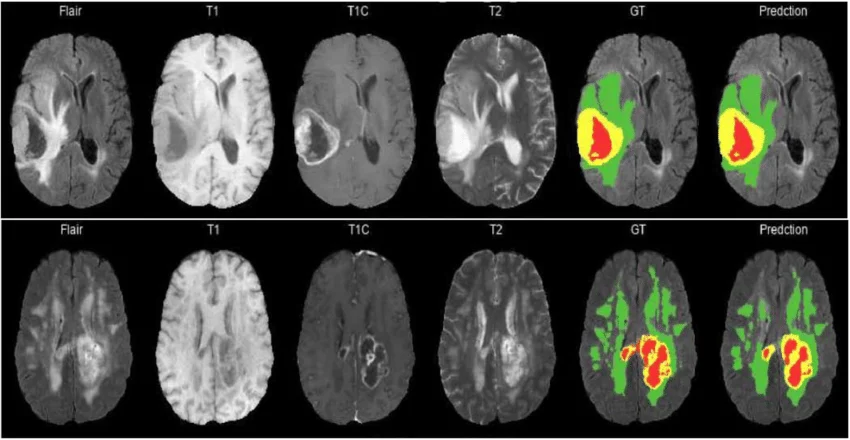
Figure 5: Overview BraTS dataset
7.1. Region-based Training of nnU-Net
There is a reality that surgeons do not care about each discrete label. They view brain tumors like "Russian nesting dolls" (nested inside each other):
-
Whole Tumor: The overall size.
-
Tumor Core: The solid part to be resected.
-
Enhancing Tumor: The most dangerous part.
If we teach AI to learn according to 3 discrete labels, the AI will easily get confused and draw disjointed, illogical tumor parts. nnU-Net has a super cool feature called "Region-based Training". You just need to declare a simple dataset.json file to tell nnU-Net: "Hey, learn how to draw the whole tumor first, then draw the tumor core over it, and then draw the most dangerous zone right in the middle". And just like that, nnU-Net understands and solves the problem smoothly!
Basic configuration without using "Region-based Training"
...
"labels": {
    "background": 0,
    "edema": 1,
    "non_enhancing_and_necrosis": 2,
    "enhancing_tumor": 3
},
...
Applying "Region-based Training" into nnU-Net
...
"labels": {
    "background": 0,
    "whole_tumor": [1, 2, 3],
    "tumor_core": [2, 3],
    "enhancing_tumor": 3  # or [3]
},
"regions_class_order": [1, 2, 3],
...
7.2. Practice: Setting up nnU-Net for the BraTS data (Step-by-Step)
Now let's roll up our sleeves! Below is the perfect standard process to run nnU-Net.
Regarding hardware configuration: You will need a good Graphics Card (GPU) to train this model. At a minimum, it should be a GPU with 10GB VRAM (like RTX 2080ti, 3080, 4090) along with a relatively strong CPU (at least 6 cores 12 threads) to process data in a timely manner, or more simply, you can use Kaggle's server with 2 T4 GPUs for the training process.
You can view the code where I trained the nnU-Net model at Kaggle
7.2.1. Download code, declare environment and configure
First, you need to clone the source code from nnU-Net's git to be able to run the code.
git clone https://github.com/MIC-DKFZ/nnUNet

cd nnUNet
Once inside the nnU-Net folder, you can read the nnU-Net documentation in the documentation folder for installation instructions, data setup, and how to run the model.
Let's start setting up the environment to run nnU-Net. First, you can download and set up conda to install Python; the required python version is 3.9 or higher.
-
Install PyTorch.
-
Install the required libraries for nnU-Net.
pip install -e .
nnU-Net likes neatness. You must tell it where the raw images are located, where the preprocessed images are saved, and where the model results are stored.
os.mkdir('./dataset')
os.mkdir('./dataset/nnUNet_raw')
os.mkdir('./dataset/nnUNet_results')
os.mkdir('./dataset/nnUNet_preprocessed')
os.environ['nnUNet_raw'] = './dataset/nnUNet_raw'
os.environ['nnUNet_preprocessed'] = './dataset/nnUNet_preprocessed'
os.environ['nnUNet_results'] = './dataset/nnUNet_results'
7.2.2. Create dataset.json file
The dataset.json file tells the model the data type of the images, the labels, and the channels of the image.
{
    "channel_names": {
        "0": "T1",
        "1": "T1c",
        "2": "T2",
        "3": "FLAIR"
    },
    "labels": {
        "background": 0,
        "whole_tumor": [1, 2, 3],
        "tumor_core": [2, 3],
        "enhancing_tumor": 3  # or [3]
    },
    "numTraining": 484,
    "file_ending": ".nii "
}
7.2.3. "Fingerprint reading" and Preprocessing
With just 1 command line, nnU-Net will scan your entire BraTS dataset, execute the algorithms to calculate size and intensity normalization mentioned above, and automatically sketch out the best training plan (Plans).
nnUNetv2_plan_and_preprocess -d 001 --verify_dataset_integrity
After running the above command, we will have the preprocessed images, the data fingerprint, and the plans files for the model to train saved in the nnUNet_preprocessed folder.
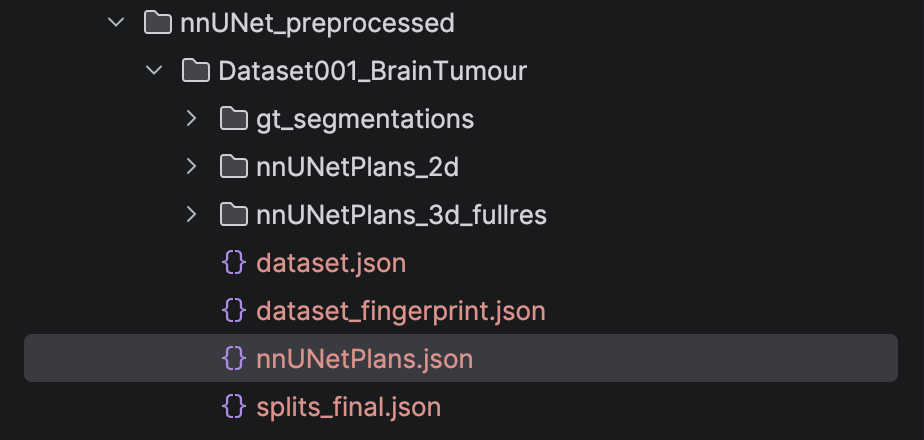
Figure 6: Folder nnUNet_preprocessed after run script nnUNetv2_plan_and_preprocess
7.2.4. Model Training
nnU-Net doesn't just create 1 but up to 3 structures for you to test:
-
2d: Learns from each thin slice (fast, consumes little memory).
-
3d_fullres: Learns an entire large 3D block (the most standard but heavy on the machine).
-
3d_lowres & 3d_cascade: Learns from a blurry image to get an overview, then zooms in to draw details (as explained above).
To train the best 3D model (3d_fullres) with the first dataset (Fold 0) and 5 epochs, utilizing 2 GPUs if you have more than 1 GPU, you type:
nnUNetv2_train 001 3d_fullres 0 -tr nnUNetTrainer_5epochs -num_gpus 2 --npz
7.2.5. Automatically selecting the champion (With Post-processing)
After training is complete, how do you know which configuration is best? Or should you use noise removal algorithms in the post-processing stage? Instead of having to manually inspect it, let nnU-Net decide:
nnUNetv2_find_best_configuration 001 -c 3d_fullres
Pro tip: Usually, with solid organs like the heart or liver, removing isolated noise spots on the outside (Connected Component Removal) is very good. BUT with brain tumors, sometimes those small spots are metastatic tumor branches. The nnU-Net algorithm will automatically calculate whether removing them increases the score or loses the disease traces, thereby making the decision to keep or discard this feature! It is truly very smart.
7.2.6. Running prediction (Inference/Ensembling)
When there is a new patient, you can run predictions. nnU-Net encourages using the Ensemble technique – which is mixing the predictions of 5 models (5 folds) together to take the average. This method helps offset errors and creates an extremely smooth, stable tumor border.
nnUNetv2_predict -i "folder containing images to be predicted" \
                 -o "output folder where you want to save" \
                 -d 001 \
                 -tr nnUNetTrainer_5epochs \
                 -p nnUNetPlans \
                 -c 3d_fullres \
                 -f 0 \
                 -chk checkpoint_best.pth
You can view the results using the ITK-SNAP.
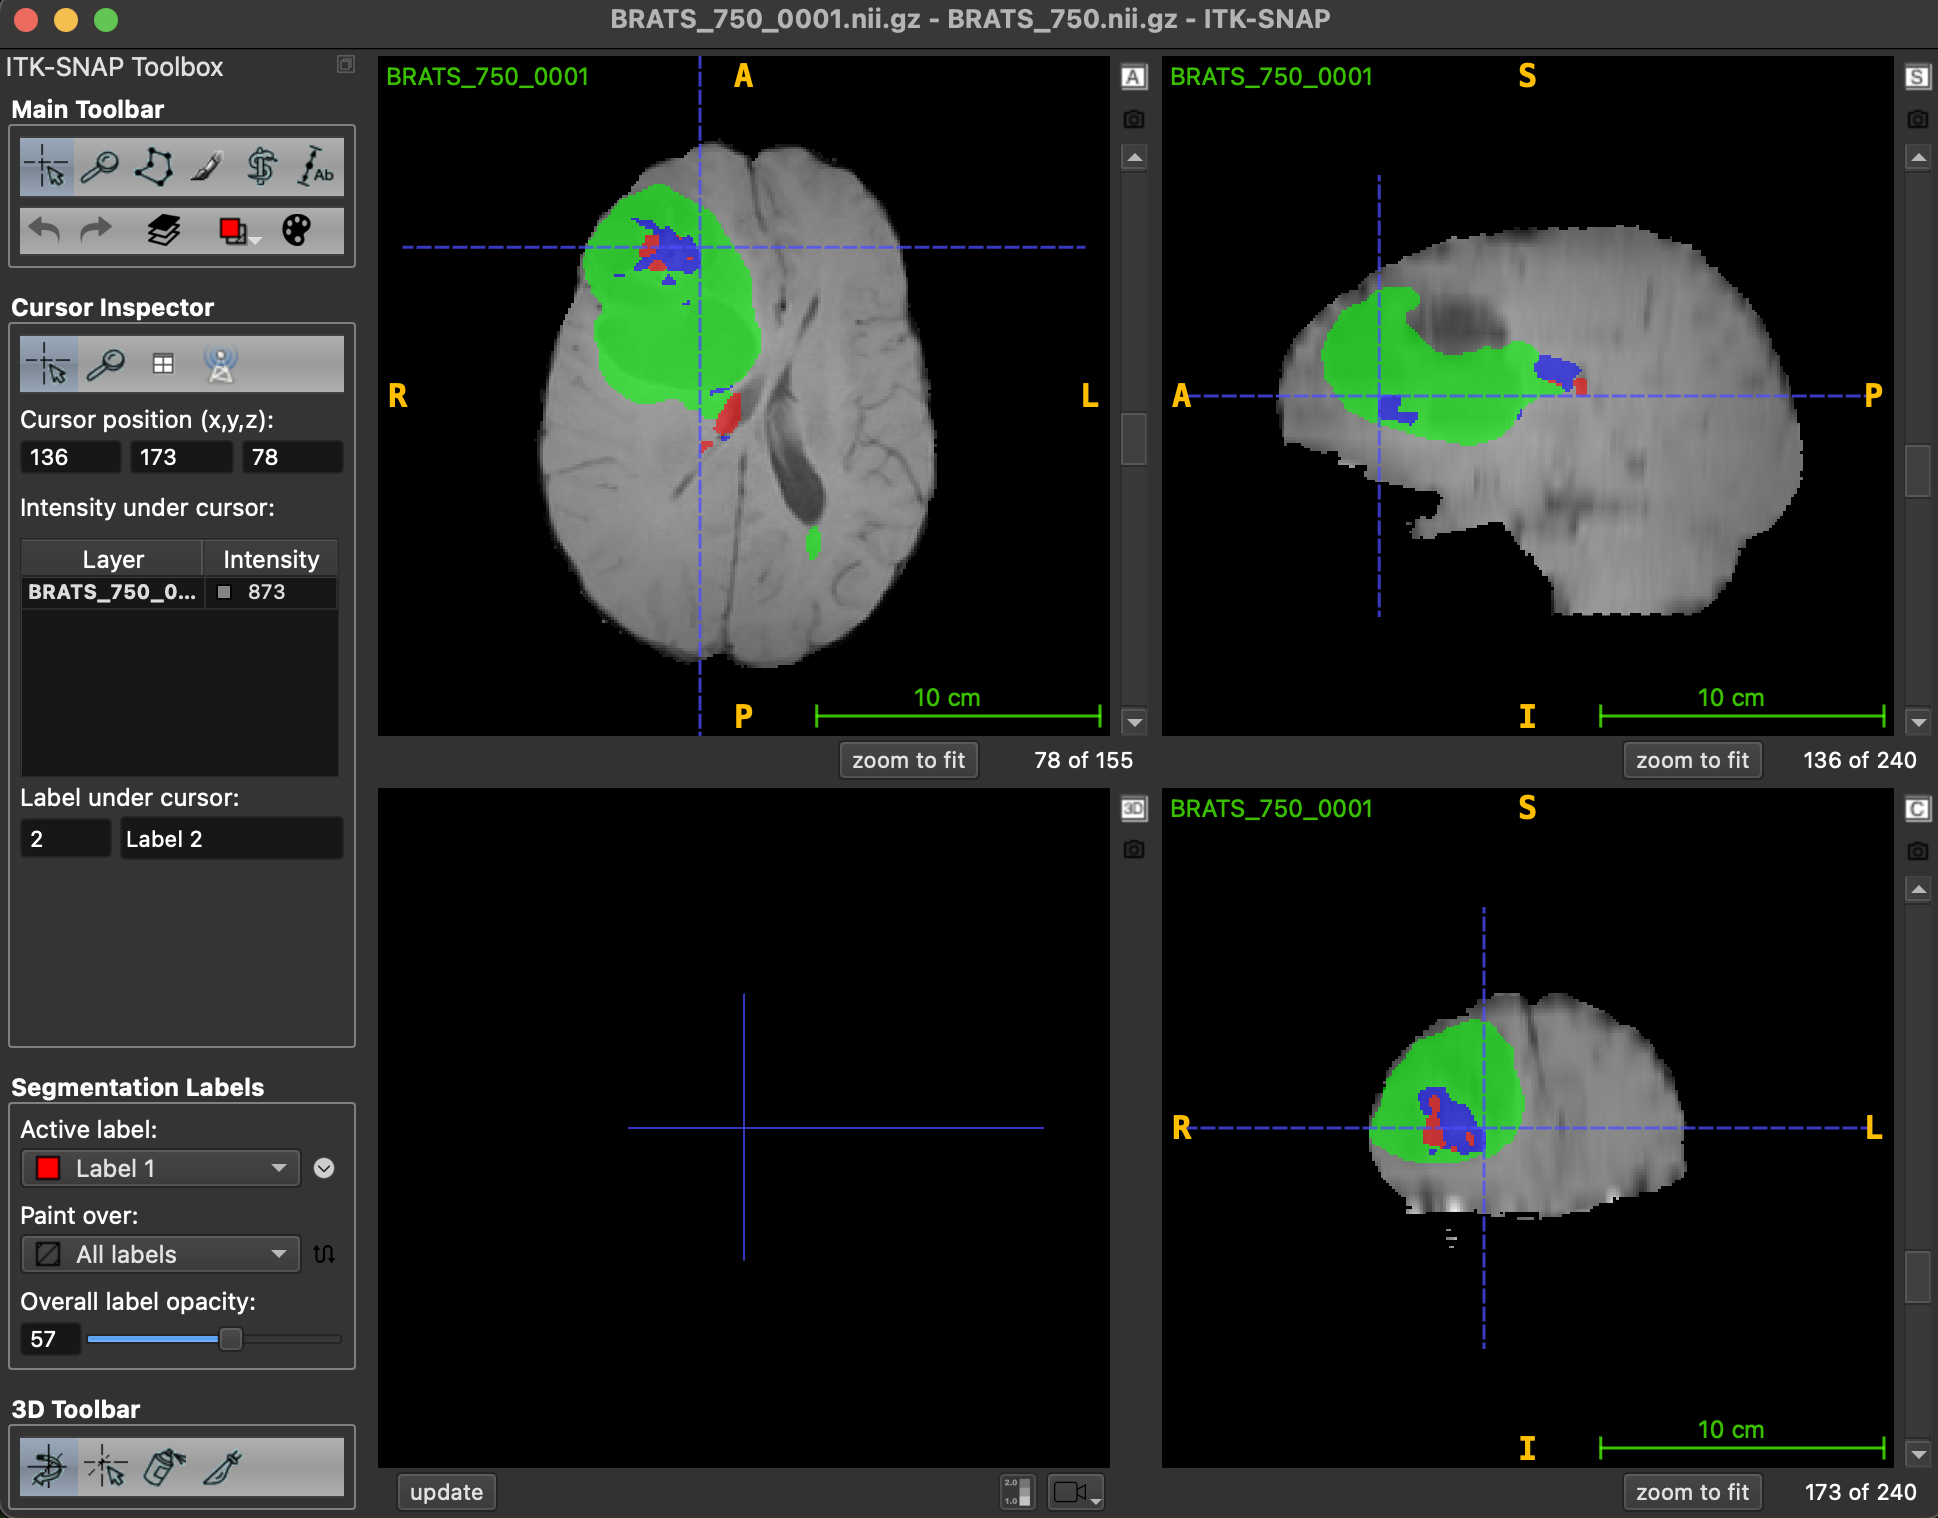
Hình 7: Visualize result with ITK-SNAP
8. Conclusion
nnU-Net has truly redefined the way we do AI in healthcare. Instead of immersing in altering the core structure of the neural network, this tool helps researchers and doctors "automate" all the most complex optimization operations through an incredibly logical data pulse-taking process. By intelligently understanding data and having a flexible post-processing strategy, nnU-Net on the BraTS dataset is not just a demo problem, but a perfect stepping stone to bring AI into the actual clinical setting.
References
[1] F. Isensee et al., "nnU-Net: Self-adapting Framework for U-Net-Based Medical Image Segmentation," arXiv preprint arXiv:1809.10486, 2018.
[2] P. Gupta, "nnU-Net : The no-new-UNet for automatic segmentation," Medium, Aug. 10, 2020. [Online]. Available: https://medium.com/miccai-educational-initiative/nnu-net-the-no-new-unet-for-automatic-segmentation-8d655f3f6d2a
[3] S.-H. Tsang, "Brief Review — nnU-Net: A Self-Configuring Method for Deep Learning-based Biomedical Image Segmentation," Medium, Feb. 16, 2023. [Online]. Available: https://sh-tsang.medium.com/brief-review-nnu-net-a-self-configuring-method-for-deep-learning-based-biomedical-image-97fedf4b2079
Chưa có bình luận nào. Hãy là người đầu tiên!